My Home Lab Set Up
Home Lab Benefits
Home labs are often a topic of conversation for all ranges of Cyber Security professionals. Having a home lab is great for a variety of different reasons:
A new vulnerability is found, you want to research it? Deploy the software in your lab for testing.
Interested in learning more about offensive security? Download a vulnerable VM to your lab and practice attacking it.
New to security and want to learn more about Linux. You can set up a Linux VM in your lab.
Learn a new concept in school or while preparing for a certification … You guessed it, you can keep experimenting with it in your home lab.
The list goes on for projects you can do with a Home Lab. These are simple examples, but you can expand your lab into a full development or testing environment. The possibilities are endless and have great carry-over to the workplace. I have been on several interviews where we discussed what my home lab setup is and what I have been working on recently. Let’s dig into my setup a bit and what other options are for developing a lab.
Honestly a “home lab” can be as simple or as complicated as you want it to be. The simpler the lab, the less work it takes for you to maintain. I am going to talk about two different lab set ups I have, but I think going with the simpler method is easier especially for anyone fairly new to cyber or IT in general.
Using A Hypervisor
Personally, the easiest setup for me has always been grabbing a computer with decent specifications (RAM and hard drive space primarily), installing a Hypervisor (VMware, VirtualBox, etc.), and then installing a few virtual machines to play with. This method is relatively cheap. A personal VMware license today is about $150 and if you choose to, use VirtualBox or VMware for free is also fine to do. I think one of the main reasons I decided to pay for VMware was getting access to VM snapshots and I just preferred the VMware Interface, but it's really up to you, your goals, and your budget.
I have a licensed version of VMWare installed on my Desktop and Laptop at home. It’s great for one-off testing scenarios, used for classes on the go when the instructors provide virtual machines for you to work in, and is super easy to make configuration changes to on the fly. This method is the easiest and most cost-effective I have done. I would recommend following simple guides on YouTube that show how to build the specific environment you want to emulate.
Below are a few sample ideas I have done in the past.
Walked through deploying Splunk and Zeek from home before in my lab environment following Udemy courses and official Splunk Walk throughs. You could replace splunk with Security Onion or any other tool you want to deploy and learn more about. Many security tools are either freely available for training purposes or offer a free trial version. Great opportunity to learn!
I have set up a vulnerable Active Directory instance for testing following TheCyberMentor’s great instructional video.
I have a malware analysis environment I built following Lenny Zeltzer’s blog. This set up is my go to and is what I normally use for malware analysis. Lenny’s site is full of great resources.
The list of resources to build whatever environment you want and make it your own is endless here. Configuring everything is an exercise in itself and you will find that just walking through someone else’s guide will help you learn. Find some projects that interest you, follow guides/manuals, and then customize it to make it your own.
Expanding My Lab
A few years ago I decided I wanted to expand my home lab and home network. With the help of a few friends, I built out a home network with multiple VLANs, a home ESXI server, and a designated lab VLAN. This approach was more expensive than paying for a single VMware License, but I can honestly say I learned a ton about network configurations from the process. It also comes with more maintenance and troubleshooting issues than using a Hypervisor for your lab.
I do not have a super strong networking background, so I went through a ton of growing pains both configuring everything and troubleshooting issues. (Since this setup is also part of my home network if something goes down it stops everything from working LOL…)
Some of the pros of my lab expansion:
Using the ESXI to host my VMs lets me free up my workstation space. I do not need to store the virtual machines, snapshot files, and other software directly on my PC.
I have dedicated resources on the ESXI server and can access it remotely over a VPN.
I set up a network tap interface connected to my ESXI and can monitor my home traffic. This is awesome for setting up more home security monitoring and getting to learn about configuring physical equipment.
The ESXI can be accessed from your VMware client so it can be incorporated easily into my existing VMware solution.
I still have the ability to create physically separated networks using my Hypervisor or segregating them over my network, and now have the option to incorporate additional physical equipment.
VMWare ESXI is very popular in the workplace. Utilizing it for my home lab design has helped me gain a stronger understanding for configuring and managing other ESXI deployments.
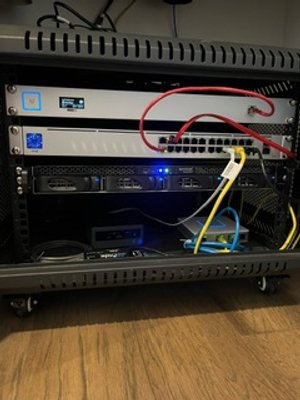
My Setup:
Unifi Cloud Key (This is the main controller for my network.)
Unifi 24 port Switch
Unifi Access Points (I have a basic Access Point and an Access Pro for home Wi-Fi)
Unifi 4 port switch (used for hard-wired devices on a separate floor from my main switch)
Unifi Gateway (I originally used a pfsense here, but found having all of my devices integrated into one Unifi Cloud Key was easier for configuring/updating)
Intel NUC (I turned the intel NUC into a small ESXI server. The process was somewhat painful requiring some configuration changes with the ISO file for it to work.)
ReadyNAS (Not really necessary, but I use it for extended storage and have a mapped drive to my ESXI server for extra VM space. Great learning experience for configuring shared drives and utilizing RAID.)
Other Options
Utilizing cloud technologies and automation or other technologies like docker are great options for configuring and deploying a lab environment. I haven’t personally set up anything in the cloud, but if you think its the best option for you, then I recommend you research the cost and ways to secure your environment as you configure it. I’m, sure there are other great tutorials available for configuring a cloud lab environment.
The cloud offers a variety of benefits and can be accessed from anywhere making it another great lab building choice. Like I said in the beginning your lab can really be whatever you want it to be and the technologies you use can help you gain a stronger understanding for your career. If you want to become more familiar with the cloud maybe using a cloud provider to host your lab is the way to go.
I hope this quick article is useful for some people with a overview of my home network and lab setup. I learned a ton building it from scratch and have continued to learn utilizing it to build out various projects. I think hands-on learning really solidifies your understanding. If you want to start learning on your own, setting up a virtual machine and is a great first step.